使用笔记本开发时性能有限,内存容量也不支持拉起太多服务,还是使用高配 Windows PC 上的 WSL 2 开发起来比较方便。与 Linux 相比,Windows 上的 OpenSSH 服务端功能在登录验证时有着自己的特性,值得记录下。整个登录链路结构如下:
---
config:
  theme: 'base'
  themeVariables:
    darkMode: true
    fontSize: 16px
    primaryColor: '#000'
    primaryTextColor: '#fff'
    primaryBorderColor: '#02d7f2'
    lineColor: '#fcee09'
    tertiaryColor: '#0d0d0d'
    tertiaryBorderColor: '#cdcdcd'
---
flowchart LR
  subgraph Tailscale
    direction LR
    A
    B
    subgraph PC
      direction LR
      B
      C
    end
  end
  A["Laptop"] e1@-- SSH --> B["Windows"]
  B e2@-- 本地进程通信 --> C["WSL2"]
  e1@{ animate: true }
  e2@{ animate: true }
PS> if (!(Get-NetFirewallRule-Name"OpenSSH-Server-In-TCP"-ErrorAction SilentlyContinue)) { Write-Output"Firewall Rule 'OpenSSH-Server-In-TCP' does not exist, creating it..." New-NetFirewallRule-Name'OpenSSH-Server-In-TCP'-DisplayName'OpenSSH Server (sshd)'-Enabled True -Direction Inbound -Protocol TCP -Action Allow -LocalPort22 } else { Write-Output"Firewall rule 'OpenSSH-Server-In-TCP' has been created and exists." }
无密码登录
开启 OpenSSH Server 服务后,我们尝试下能否登录:
$ ssh localhost
The authenticity of host 'localhost (::1)' can't be established.
ED25519 key fingerprint is SHA256:c+JdPZlkDWQ1gfd+0PM1eN7Pf123GydtvYe45qCV6j7.
This key is not known by any other names.
Are you sure you want to continue connecting (yes/no/[fingerprint])? yes
Warning: Permanently added 'localhost' (ED25519) to the list of known hosts.
thinklong@localhost's password:
Permission denied, please try again.
由于 Windows PC 是我的个人电脑,没有为管理员用户 thinklong 设置密码,使用空密码登录会被拒绝。可以在 sshd_config 中开启与密码登录有关的配置项:
C:\ProgramData\ssh\sshd_config
# To disable tunneled clear text passwords, change to no here! PasswordAuthentication yes# 允许密码验证 PermitEmptyPasswords yes# 允许空密码登录
把这两个配置项都设为 yes,执行 Restart-Service sshd 命令重启 sshd 服务后再次尝试登录,发现仍然要求输入密码,这就是 Windows 上特殊的地方。
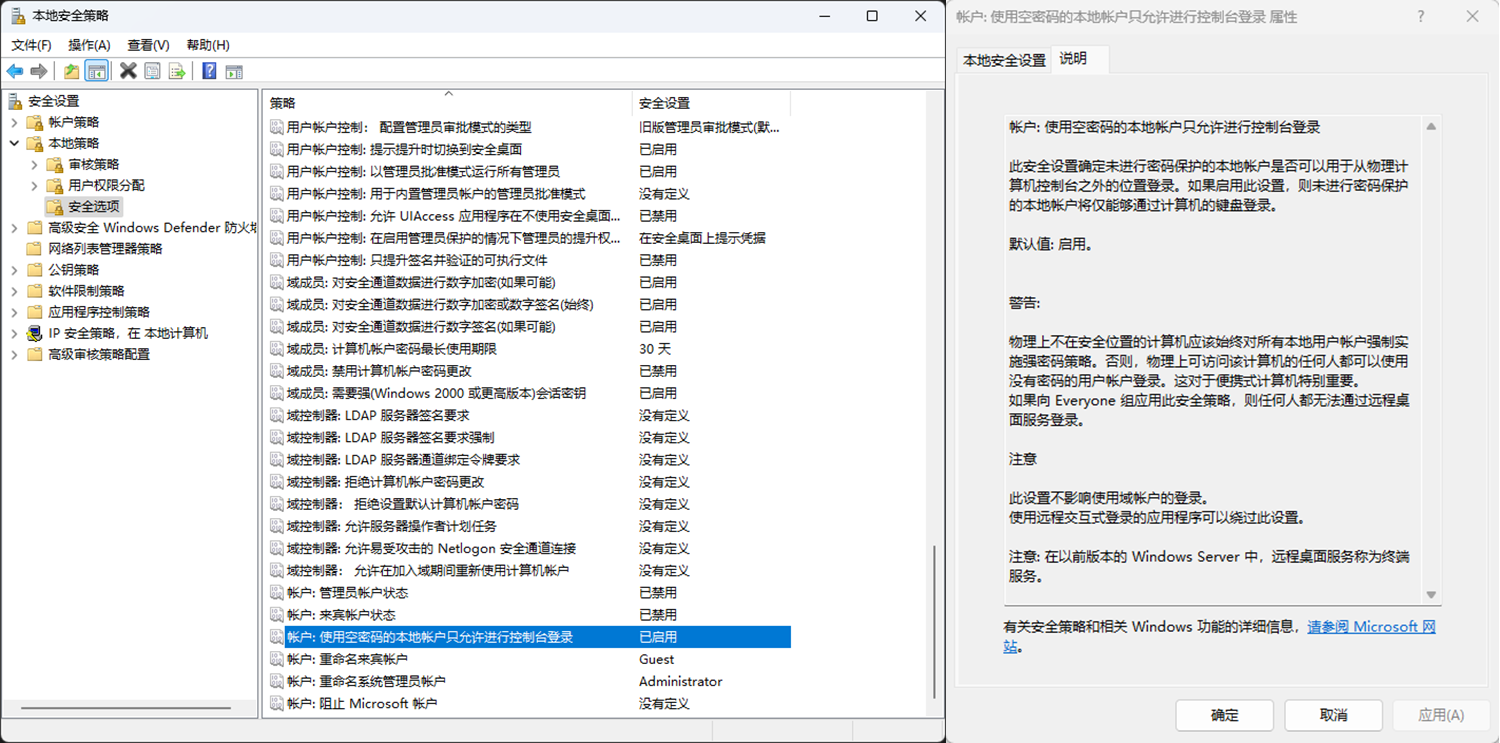
在 Linux 上 sshd 会自己查 /etc/shadow,如果密码是空的就能允许该用户无密码登录。但在 Windows 上 OpenSSH 是调用 Windows 的登录 API来验证用户密码,并且在 Windows 本地安全策略(可以通过运行 secpol.msc 打开)中有这么一条策略——“账户:使用空密码的本地账户只允许进行控制台登录”,默认为启用,旨在限制空密码账户只能通过控制台本地登录(Logon Type 为 2),而 SSH 登录通过事件查看器看到它属于网络登录(Logon Type 为 3),将这条策略改为禁用才能允许 SSH 空密码登录。
# To disable tunneled clear text passwords, change to no here! - #PasswordAuthentication yes + PasswordAuthentication no - #PermitEmptyPasswords no + PermitEmptyPasswords no
此外还注意到 sshd_config 文件存在如下配置:
C:\ProgramData\ssh\sshd_config
# The default is to check both .ssh/authorized_keys and .ssh/authorized_keys2
# but this is overridden so installations will only check .ssh/authorized_keys
AuthorizedKeysFile	.ssh/authorized_keys

Match Group administrators
       AuthorizedKeysFile __PROGRAMDATA__/ssh/administrators_authorized_keys
PS> ip address | grep eth0 2: eth0: <BROADCAST,MULTICAST,UP,LOWER_UP> mtu 1280 qdisc mq state UP group default qlen 1000 inet 172.30.219.137/20 brd 172.30.223.255 scope global eth0